Category Archives: Tutorials
How to install Daemon Tools
Right now, I will be explaining how to use Daemon Tools. First off, here’s an intro. Daemon Tools is a virtual drive used to virtually emulate, open or run ripped CD or DVDs. It can read files with file extension of (.iso), (.cue), (.bin), (.nrg), and many more. Daemon Tools have 4 versions. The three of it are DAEMON Tools Net, DAEMON Tools Pro Advanced and lastly, DAEMON Tools Pro Standard. These versions of Daemon Tools aren’t for beginners, should be paid or else you’ll get a trial version, so we’ll be skipping them. The version we’ll be using is DAEMON Tools Lite. Don’t worry, this version does all the common things a virtual drive applications does. So let’s start this tutorial.
What you need:
– Daemon Tools Lite v4.35.6: download here
– Internet Connection
– 1GHz CPU and atleast 256MB of RAM
– 30MB free of Harddisk space
Instructions:
1. Download and install Daemon Tools Lite
Once you run the setup/installer file of Daemon Tools Lite, it will ask you if you want Paid License or Free License. Choose Free License immediately and click Next.

In the next page, it will ask you some not-so-important things about accessibility of the application. I suggest you uncheck the following:
– Integrate with Windows Explorer: this will create an item to your right-click option which is, in my opinion, not necessary since Daemon Tools isn’t a program you will always use minute by minute, plus, you wouldn’t let your right-click option to be messy, right?
– Windows Gadget: this isn’t really important, and is only applicable for users with Windows Vista or 7 systems.
– Browser Toolbar: this works like Google Toolbar or Yahoo! Toolbar, which is in my opinion, makes your browser eat lots of RAMs!
– Daemon Tools default Search Provider: this will make your search provider to be Daemon Tools as default, and not Google or Yahoo! or even bing.
– Desktop Shortcut: In my case, I don’t use Desktop items, so if you want, you can consider checking it again.
and leave Start Menu Shortcut, checked, alone and click Next just like this:

Uncheck “Browser’s Start Page” and click Next:

After clicking “Next”, on the next page, you will see the destination path the application will be installed to. Leave it to default. For XP (C:\Program Files\DAEMON Tools Lite). For 64-bit systems (C:\Program Files(x86)\DAEMON Tools Lite). Click “Install”, and this will install the entire application. Once finished, click “Finish”.
Note: In some systems, specially those systems that are new to virtual drives, you are required to restart your computer.
2. Run Daemon Tools Lite
To run Daemon Tools Lite, navigate to Start>Programs>Daemon Tools Lite>Daemon Tools Lite
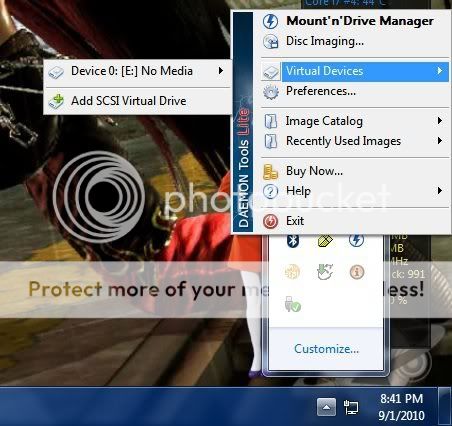
Daemon Tools Lite will be visible to your computer’s system tray, near your system clock. Right click on it to see the options.

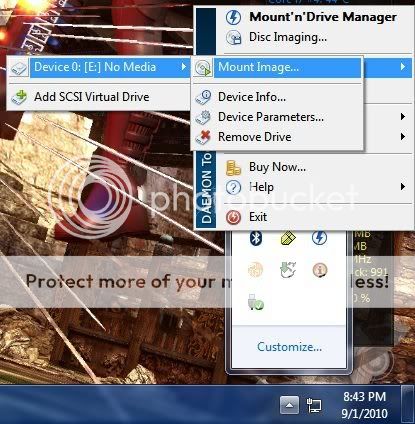
After that, navigate to “Virtual Devices”, then “Device 0: [E] No Media”, then “Mount Image”. Note: “E” is a drive letter. It is possible that it will be set to “G” or “F” or what. What you see in the submenu is what is available.

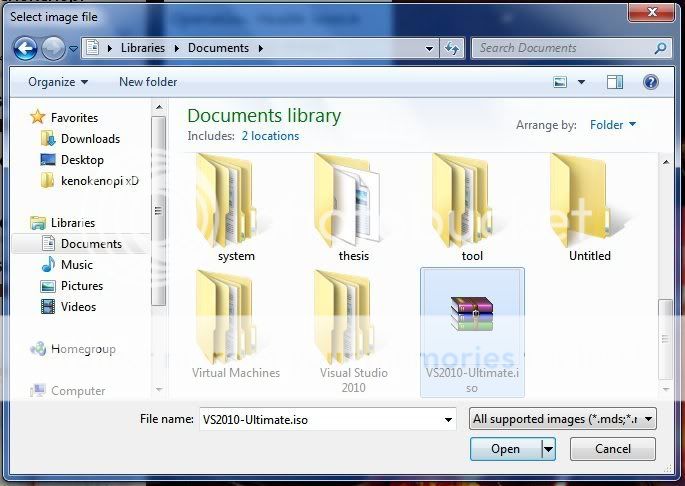
After that, a dialog box will appear, which will let you find the .iso files you need to. In this tutorial, we will be using an installer of Visual Studio Ultimate 2010 which is located at “C:\Users\kenokenopi\Documents” or simply, in the “Documents” folder, with a file name “VS2010-Ultimate.iso”. Locate the file, highlight it then click “Open”.
Once done, navigate to “My Computer” and you will see another optical drive installed, which is physically not true. This is the virtual drive created by Daemon Tools Lite. In this case, it is assigned in the drive letter “E:”.

This means that you can now install Visual Studio Ultimate 2010.
Then that’s it. Once done, you’re done… Enjoy ^^
If you still don’t get it, here’s a video of the tutorial I took just minutes ago:
Sorry for the quality… crappy recorder ^^
To learn more about Daemon Tools Lite, visit their official site here
|> Sum 41 – Motivation


