Category Archives: Software Development
ASP.NET | Basic Database Manipulation
You want to add a database table in your web application? want to perform ADD, EDIT, DELETE without learning SQL? Here it is…
Requirements:
-Microsoft Access 2007
-Visual Studio 2010
Before we start connecting and populating our database table data in Visual Studio 2010, first we shall make our database using Microsoft Office Access 2007. Follow the instructions below:
Open Microsoft Office Access 2007. There you’ll see a category “New Blank Database” then click the button with a caption “Blank Database” so that Access 2007 will prepare for a database with no data and table yet.

Now, upon clicking it, on the right corner of Access 2007, you will be asked to input your desired Database name with a default “Database1” value. Change it to “Students” instead. Also, you can specify in which path of your computer it will be saved. By default, it is saved in your computer’s My Documents folder. Change it to drive C:\ instead so that it is easy to locate.


Once you finished specifying the Database name and the location in which the file will be saved, click the “Create” button.

By default, Access created a blank database together with a blank table. Blank table means there’s no data inside it. That table is named “Table1”. We will change it to “Section_P1” as we will be inserting names and data from the students of Section P1.

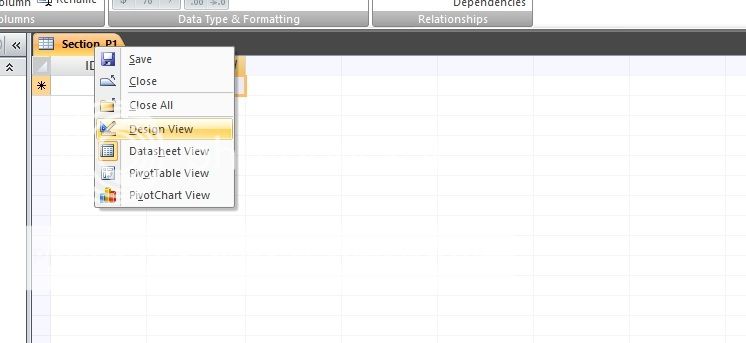
To rename it, first right-click on the Tab that says “Table1”, and choose Save, so that Access will save the database and prompt you for a different table name.

Once the prompt appears, input “Section_P1”, and then press the Ok button.

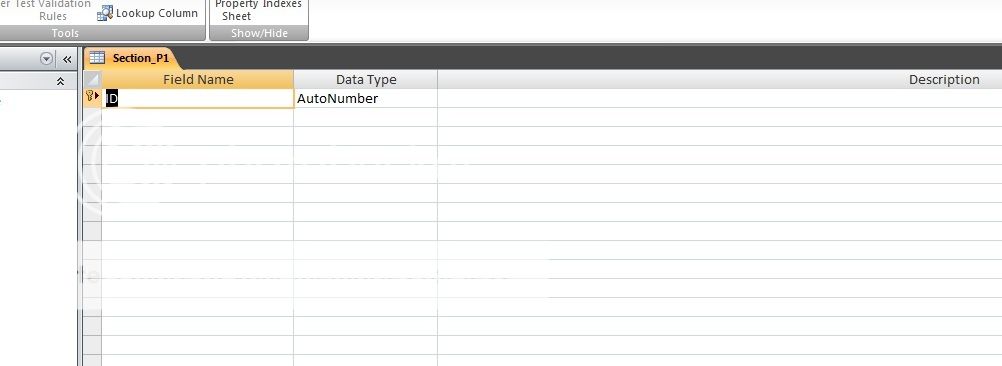
Now that we have renamed the table, it’s time for us to define what types of data our table will hold. To do that, simply right-click on the Section_P1 tab on the upper left part of access, and choose Design View.
In Design View, we can perform things necessary for our table. We can add, remove or rename fields (in Excel, we call it Columns), specify what types of data a field can hold (numbers, letters, telephone numbers, date), and assign Primary Key (a Field that can hold unique data only). In the newly created table, we are already given one field called “ID”, with AutoNumber data type (meaning, it will automatically insert sequential numbers every time we insert data in other fields). It is also set as the table’s Primary Key, which means that it is not possible to hold data that is already used in the same field.
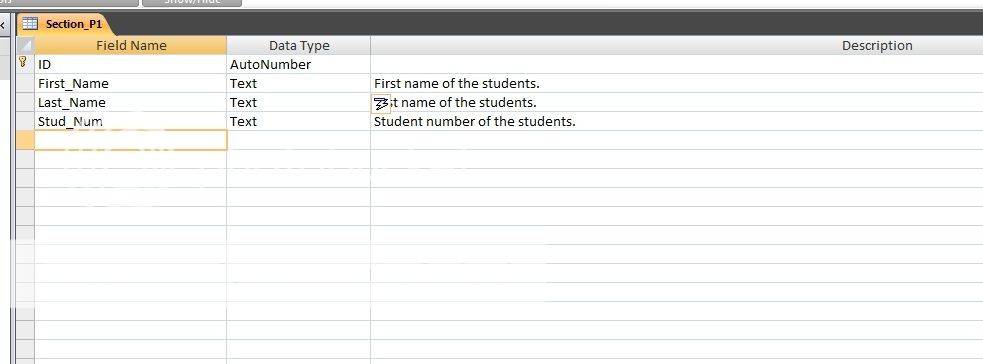
Let’s add 3 more fields in our table. Add more fields based on the information below:
Field Name Data Type
First_Name Text
Last_Name Text
Stud_Number Text
Specifying some values in the Description is optional. By following the information above, your table should contain those fields now, just like the picture below:
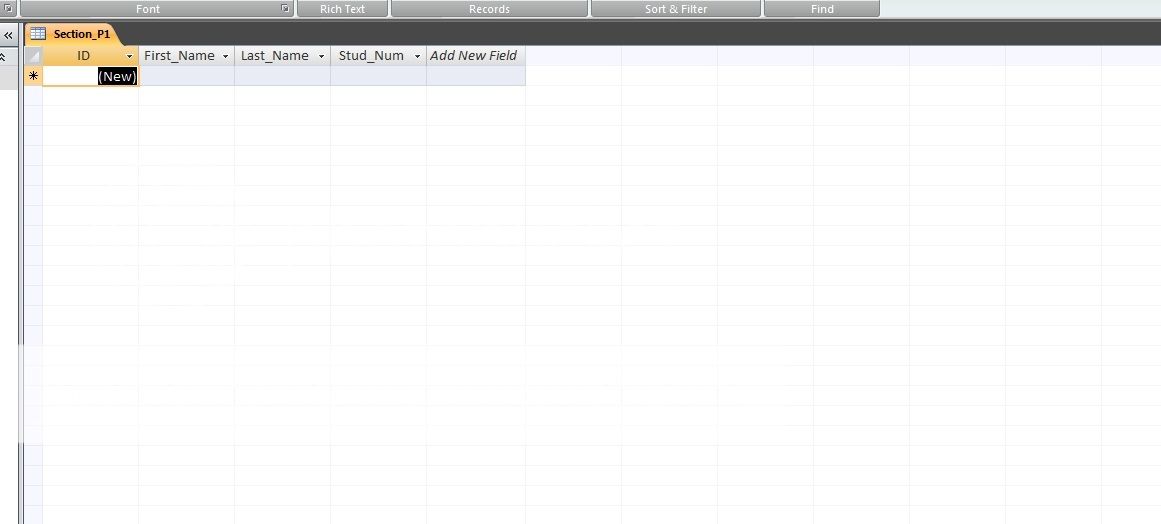
After that, right-click the Section_P1 Table tab on the upper left corner and then choose “Datasheet View” from the menu to go back to the area where you can add data to your table. It is mandatory to save your table first before continuing.

In Datasheet View, you will finally notice that the fields we have added are now appearing in our table.
Now let’s try to add Data in our table. Below is the list of students currently enrolled for the subject CSWD01 section P1. They are names (first name and last name) as well as their student number in alphabetical order. Simply analyze the information and add them to the fields.

After that, your table should be populated like this:

Save it and close Microsoft Access 2007 for now.
The next thing to do is to resume our work in Visual Studio. Load up your Web Application in Visual Studio. Once done, create a new Tab with a title “CSWD01 P1-Students” as well as a web form for it. Refer to the image below:

The form we just created will be the place where we will show the data in our table.
Do you still remember where you save your Database? Coz’ now we will try to connect our database to our project. To do that, in Menu Bar, click Data and then Add New Data Source.

After that, a window will appear in which VS will ask you the type of the data source. By default, the value Database is already selected. Leave it and click Next.

On the next window, you will be asked to choose which Database Model to use. Choose DataSet coz’ that what is needed in our project and click Next.

The next window is where you will specify the datasource. By default, the drop-down list is empty so the choice is to click New Connection. Upon clicking it, a new window will appear wherein you can locate your database file as well as the Data Provider to use. In the Data Provider option, choose OLE DB as we are using Microsoft Access Database and not SQL Database. Click the “Browse” button to locate your Database file.
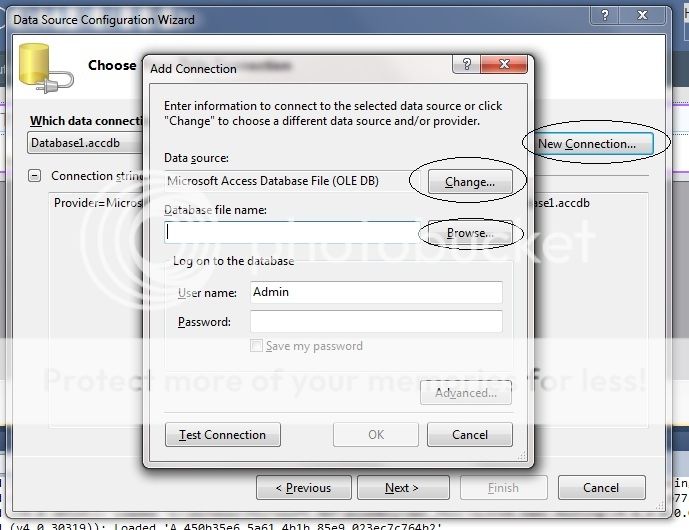
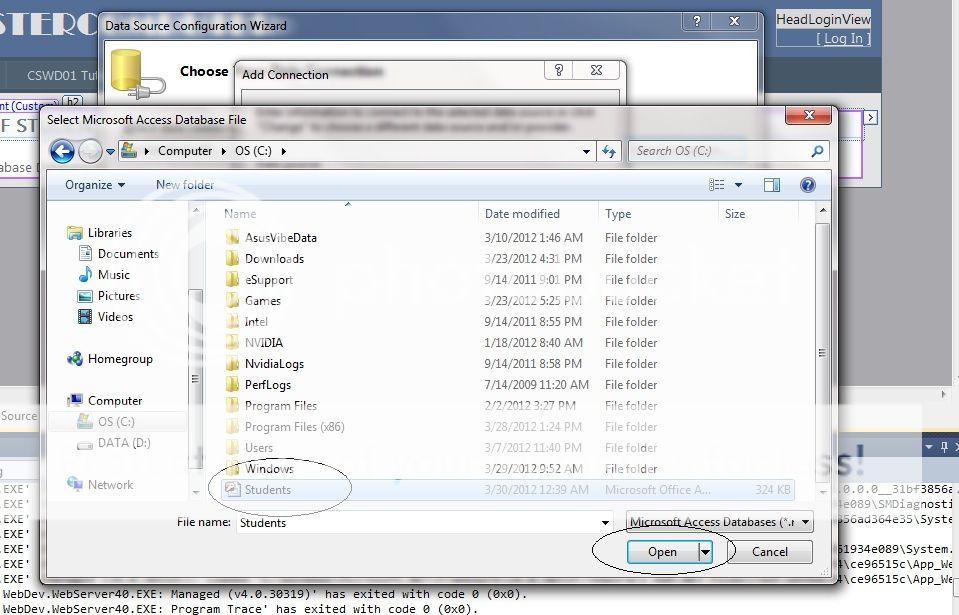
Our Database is saved in drive C:\ so locate the folder C:\ and click on the database file. Finally, click the Open button.
Once opened, optionally you can click the “Test Connection” button to make sure that the project and the database file can establish connection to each other. Otherwise, click the OK button and you will be redirected back to the wizard. Click Next right after that.
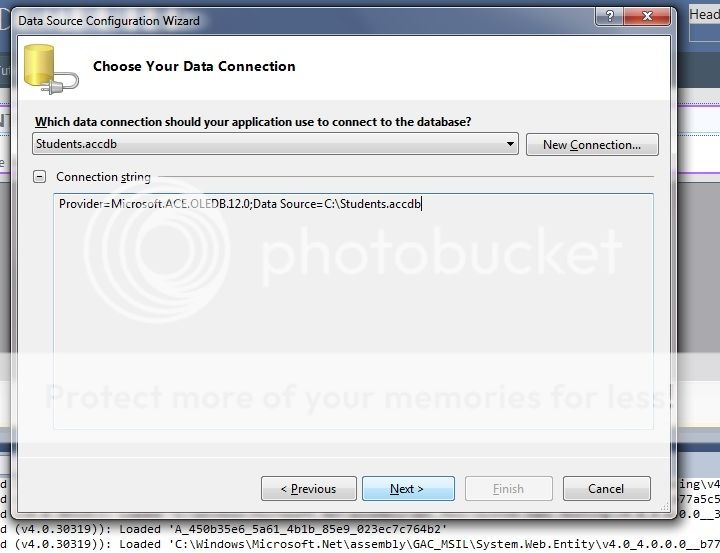
Another page from the wizard will appear asking you to save the connection string to the application configuration file. Simply click Next so that you can choose your Database Object that you want to access in your project. Check both “Tables” and “Views” and click Finish.

After that, you will be brought back to your Web Forms.

Now, to add the Database table to your Web Form, simply, on the left corner of VS, in the same place where you can find the ToolBox, click on Server Explorer.

There, you will see a nested category named “Data Connections” wherein a clickable arrow is right before it. Click it to expand, just like how the picture below is:
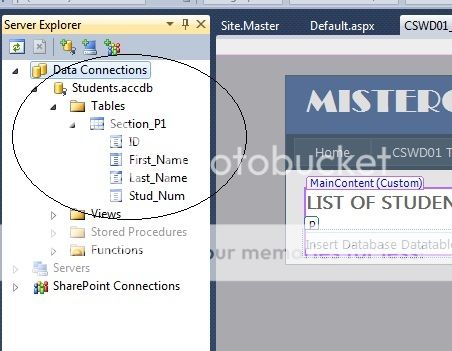
Under Tables, there goes our Section_P1 table and under it is the fields we have created earlier (ID, First_Name, Last_Name, Stud_Num). To insert the Table in our Web Form, simply drag-and-drop the Section_P1 label to an area in our form.

The result should be like this, together with a variety of options we can use to manipulate our database table.

However, by default, our Web Application is not able to modify or perform manipulations like adding data, renaming them and saving them to the database source file. To do that, simply check the following:
Enable Paging – So that if the table has more than a lot of values, VB will redesign it in a page-like view. (Optional)
Enable Sorting – If enabled, you can click the field names/columns to sort data.
Enable Editing – This means that we can edit data already stored in the table and update them right after.
Enable Deleting – If enabled, users can remove rows of data in the table.
Enable Selection – Mandatory. This means that we can select a certain row of data.
Right after that, debug the Application by pressing F5. The resulting page should return something like this:

Now we can manipulate our database table using our web app. Try opening the Database file to see whether your changes in your application works. Take note: originally you database file is stored in C:\. However, as we recall, VB asked us to create a copy of our database file in which that file will be used in the project instead of the file stored in C:\. That file is stored inside your Web Application project folder, in a subfolder called App_Data. In my case, it is stored inside C:\Users\kenokenopi\Documents\Visual Studio 2010\Projects\Dayapan\Dayapan\App_Data\Students.accdb
There you go. Have fun with Database
|> Slipknot – The Heretic Anthem
ASP.NET | Validations
Now since we have already learned how to add a new Web Form or .aspx file in our web site, the next thing to learn is how to add validations in our textboxes and other objects. To do that, read the instructions and example below:
1. Our objective is to add a registration-like form in our web application, so first we add the objects we would like to, like textboxes, labels, etc. First, add a label by dragging and dropping a Label object from the Toolbox (right side in VS2010) to your form, in CSWD01_Tutorial.aspx (design mode) right below the header that says “CSWD01 ASP.NET TUTORIAL”. Once the Label object is in our form, rename it from “Label” to “First Name:”. You can edit the formatting of the text, like font, size and color, but in this tutorial we will just stick with the default formatting supplied by VS.

2. After that, drag and drop a TextBox from the toolbox to the form, 3 spaces right next to the Label we just added.

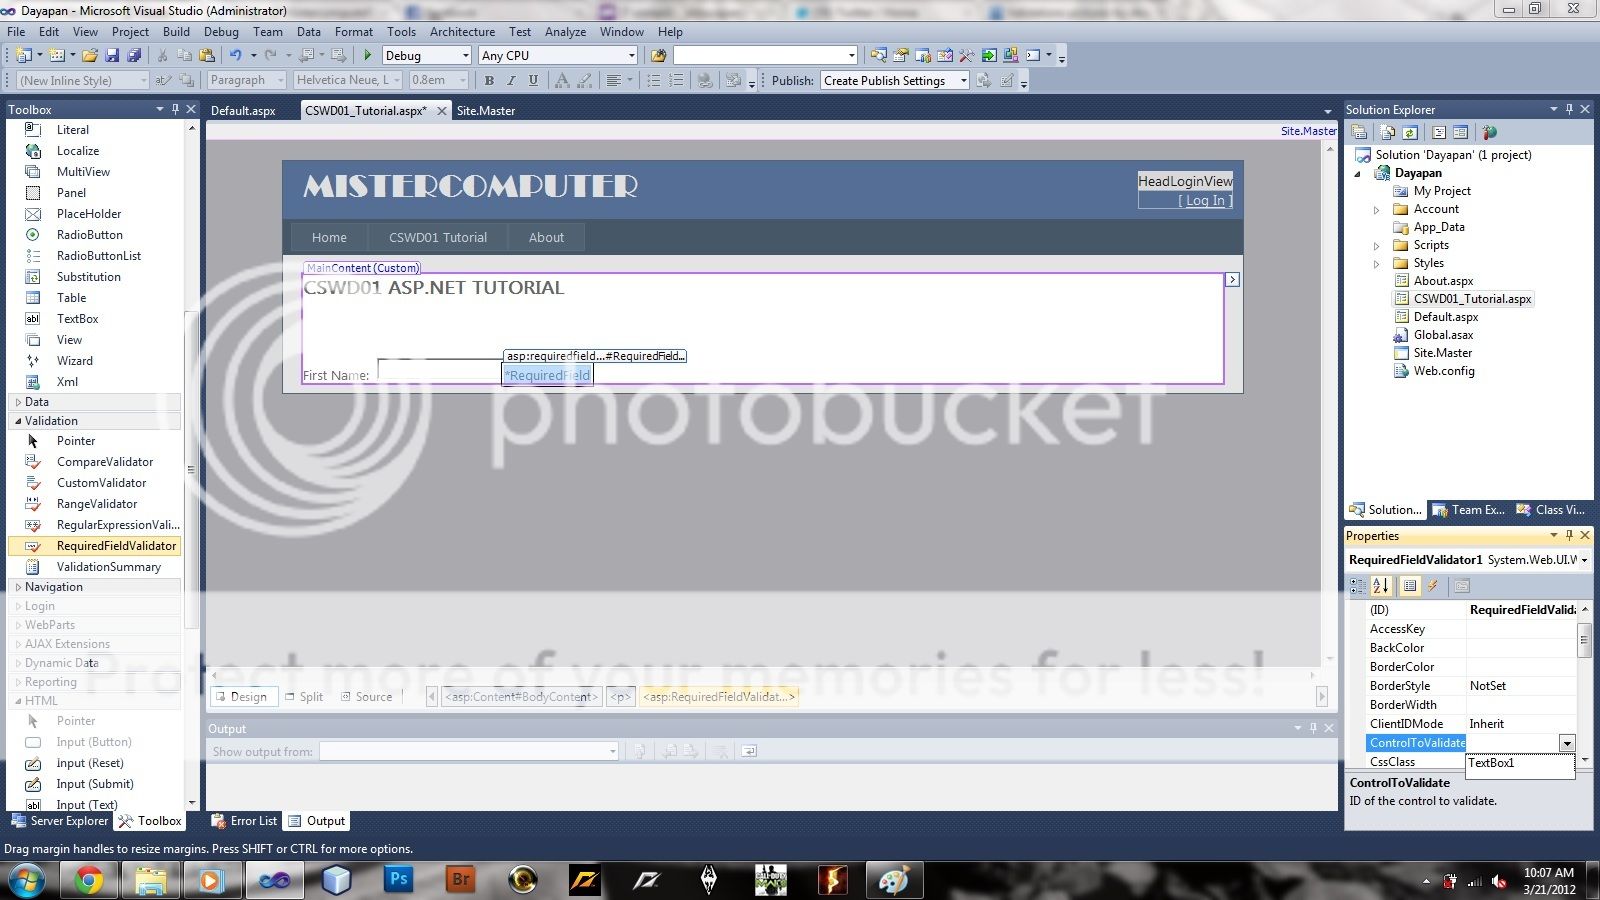
We want users to input data in our textbox before clicking the “Submit” button, meaning, users can’t go on to the next form without their first name left empty. To do that, we will add validations in our objects. In our “First Name” textbox field, we will use the RequiredFieldValidator which can be drag and dropped from the toolbox, under the Validation category.

Now rename the ErrorMessage property value from “RequiredFieldValidator” to “*Required Field”.

Again, in the properties of our RequiredFieldValidator, change the value of ControlToValidate to “TextBox1”, so that our validator will take effect once the value of TextBox1 is empty.
Right after that, we would like to test if our validator works properly. To do that, drag and drop a Button from the Toolbox to our form, below the textbox and the validator.
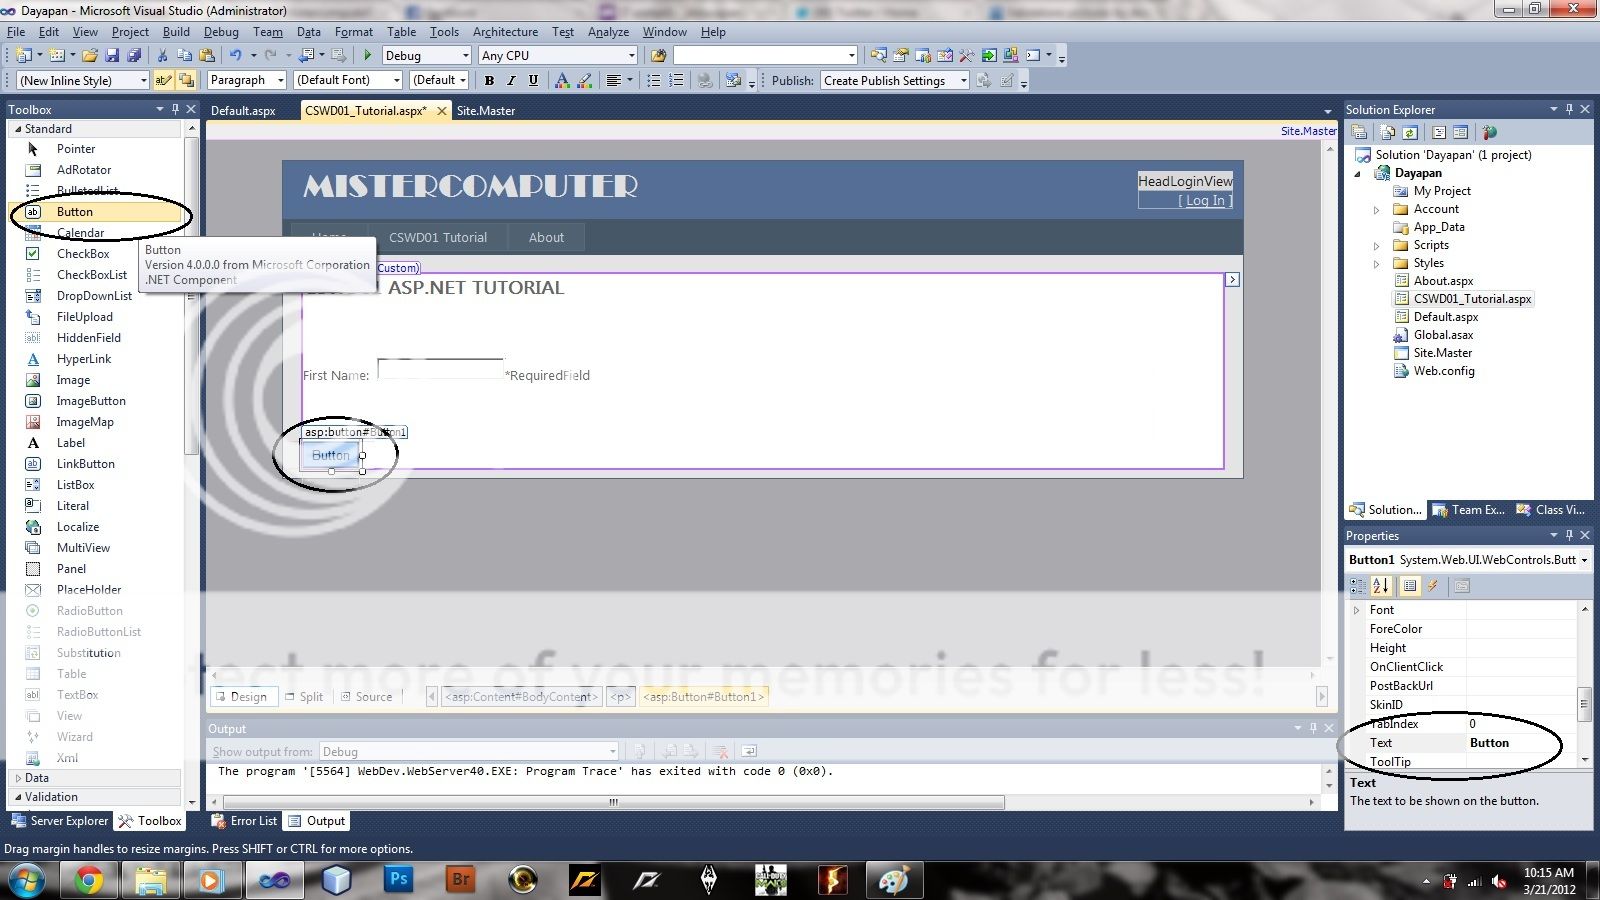
Now change the textproperty of the button to “SUBMIT”.

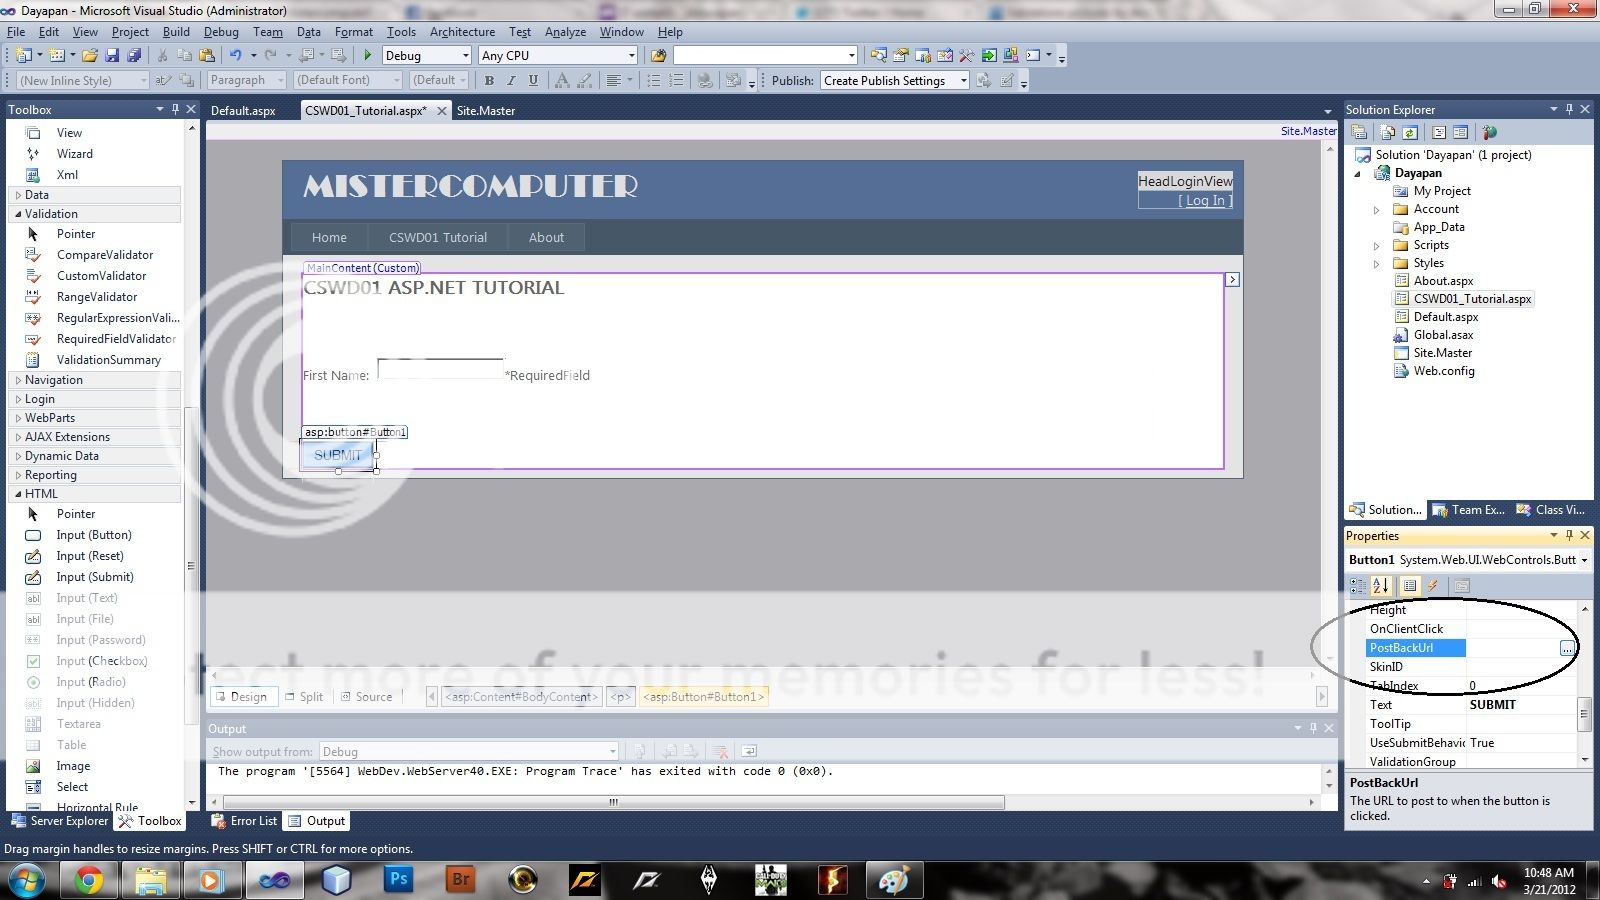
Also, to make sure that once we click the button, the validation will take effect just before showing up the next form, we will modify the PostBackUrl property of the Button to another .aspx file in our web app. In this tutorial, we will just use “Default.aspx”, so that when we clicked the button and the validation passes, the Default.aspx will show up.

Now try running the Web app and test if the validation works. If you leave your textbox with an empty value and clicked the button, the validation will show up right next to the textbox and the next page will not show up.

But if you entered a value and clicked the button, the Default.aspx will show up.

You can start self-studying other forms of validations like RangeValidator, CompareValidator, etc.
Now, CSWD01 P1, for your Finals MP1, modify the page and make it look like this:

You are free to add some more content and validations as long as the following are there.
|> At The Drive-in – One Armed Scissor
ASP.NET | Getting Started
In this part of the tutorial, you will be able to learn on how to setup your very first web application, up and running, with 2 default asp.net webpages, using the default template that came up with Visual Studio 2010, easily. This tutorial comes up with images you can refer to, and they can be viewed larger for extra details by clicking on them.
Intructions:
1. Download and install Visual Web Developer 2010 Express. (Click Here to Download, on the right side of the Microsoft website, choose “English” as your language and click the “Install Now” button below. You will start downloading Visual Web Developer web installer. It will download the necessary files so pause your other downloads for now. After that, find the installer file and execute the program so it will install VB2010.)
2. Start Visual Web Developer 2010 Express through Start Menu or Desktop Shortcut.
3. In Visual Studio, create a new Web Application. Follow the instructions below (refer to the images):
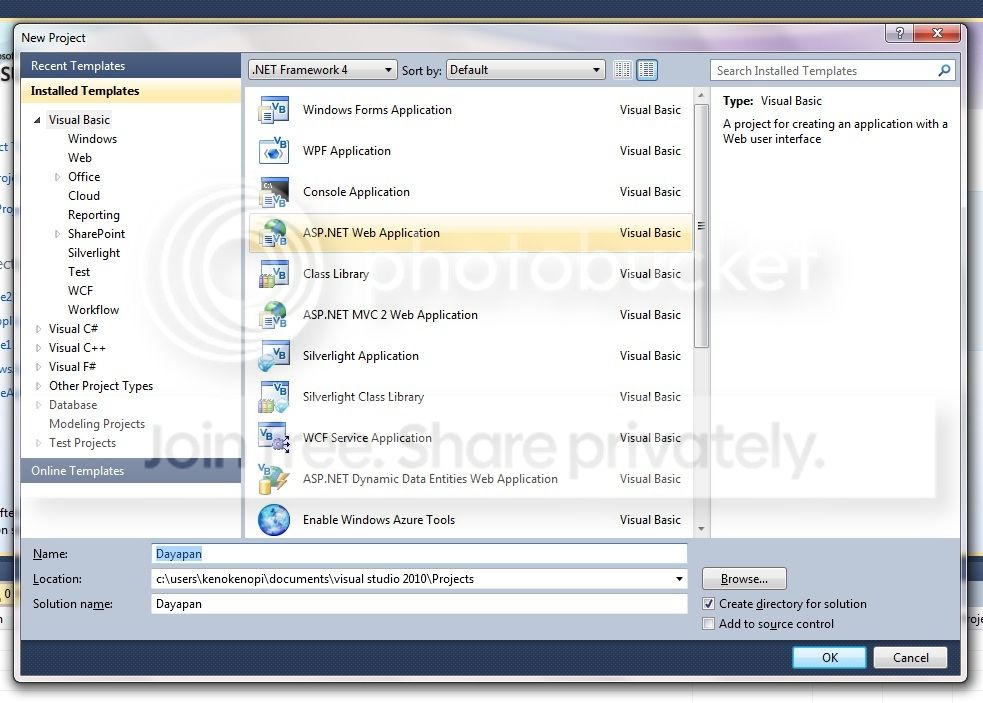
3.1. Click the File menu, New and then Project.

3.2. On the Installed Templates list box, choose Visual Basic (default), and choose ASP.NET Web Application on the list. Set the Project Name to your last name (let’s say “Dayapan”). Leave the rest of the options to default. You’re project will be saved to Documents\Visual Studio 2010\Projects\ folder. Refer to the image below:
3.3. After that, don’t forget to click the Ok button, so VS2010 will setup your website and environment.
4. Now that you are about to start building your ASP.NET web application, let’s start by familiarizing yourself on the environment of the project and the Visual Studio IDE.
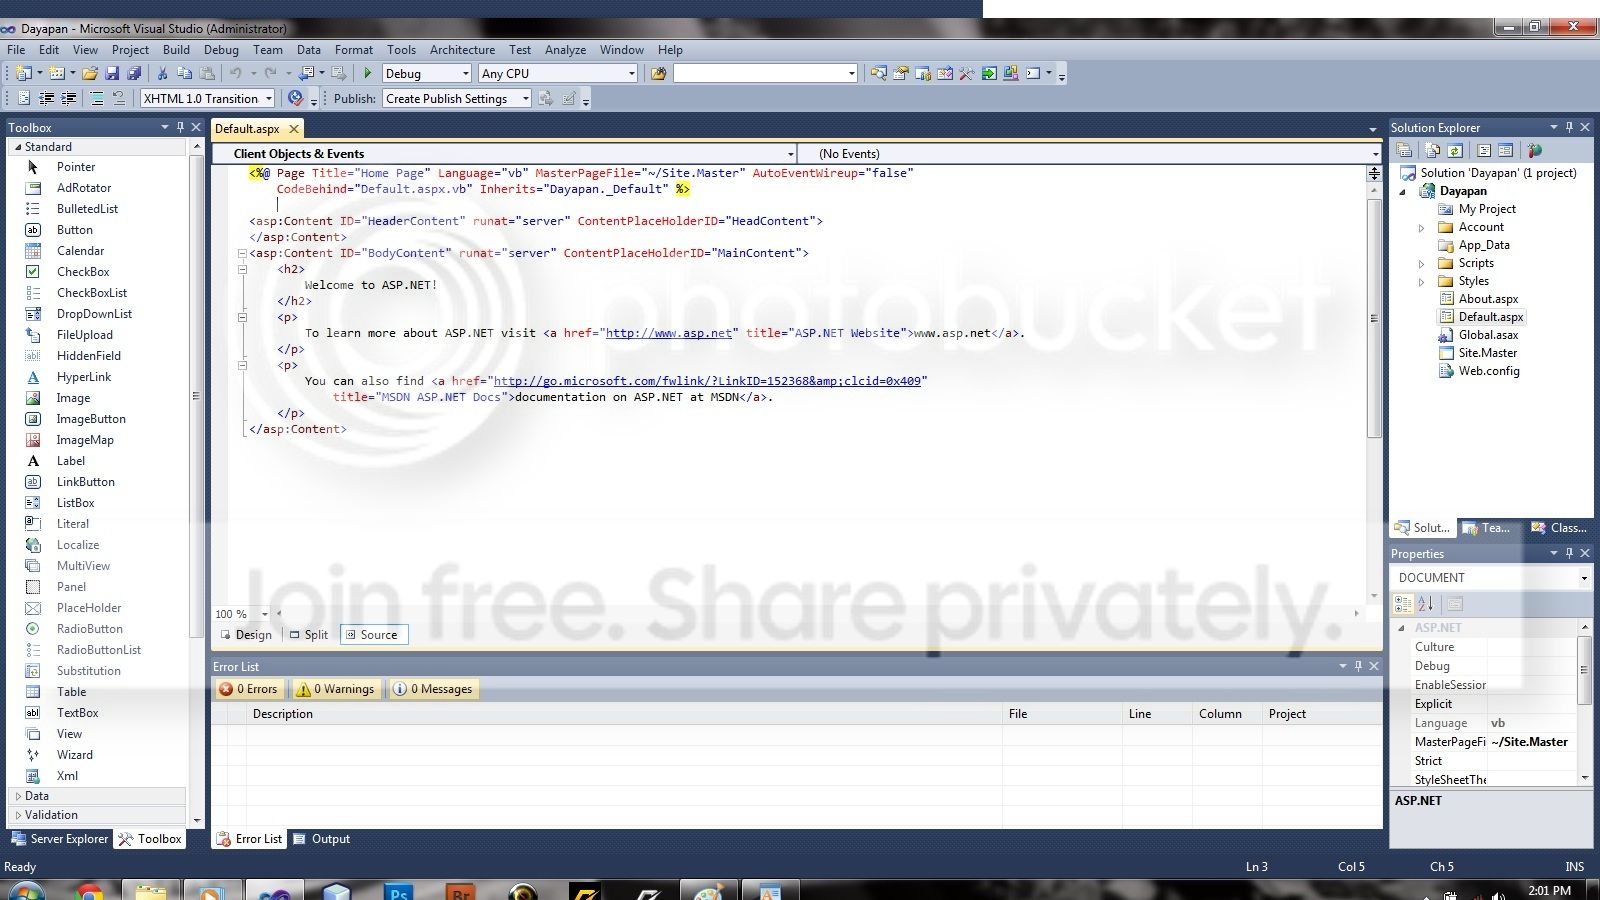
4.1. On the upper right side of the IDE, you’ll see the Solution Explorer. Here you can manage and organize all the web pages, resources and files that ispart of your web app. An ASP.NET webpage file end with a .aspx file extension. You can add/remove/edit/rename .aspx files in Solution Explorer. Take note, one single .aspx file is equivalent to a single webpage. In our web application, there is only two .aspx files , namely, Default.aspx and About.aspx. The Default.aspx is the default page that will show up once we deploy our web application, works like a “Home page”. In fact, the Source code of Default.aspx will be shown automatically right after you first created your web application (shown in the center). The About.aspx file, on the other hand, should contain contact information of the web developer of the website. Later we will personalize them.
4.2. And below Solution Explorer is the Properties window. It is where we can modify certain options for a certain object we have selected, such as its filename, Name property, Text property and more.

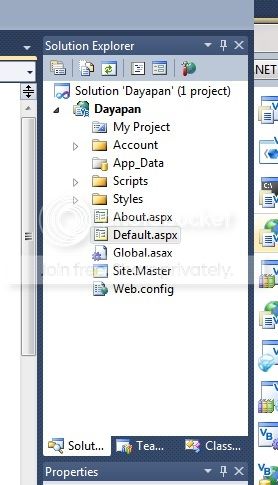
4.3. On the left side of the VB2010 IDE comes the Toolbox, where you can add, drag and drop various Objects you can use in your web application, like TextBox, Buttons, Labels, and even Database controls.
4.4. Lastly, on the center of the VB2010 IDE, you can find the Design and Source window, in tabbed-form according to the current webpage/file you are modifying. By default, the Default.aspx page is automatically opened once we create our web application.

That’s it! Now you have created your very first WebApplication that you will be using from now until the very last part of this tutorial, as well as learn the different work parts of the Visual Studio IDE. For questions and concern, fill it in the comments section, just down-down-there! Midterm MP2.
—Tutorial by Joaquin Angelito L. Dayapan II
—Junior Computer Science Instructor (AMA Fairview)
|> Taylor Swift – Superman
How to install Daemon Tools
Right now, I will be explaining how to use Daemon Tools. First off, here’s an intro. Daemon Tools is a virtual drive used to virtually emulate, open or run ripped CD or DVDs. It can read files with file extension of (.iso), (.cue), (.bin), (.nrg), and many more. Daemon Tools have 4 versions. The three of it are DAEMON Tools Net, DAEMON Tools Pro Advanced and lastly, DAEMON Tools Pro Standard. These versions of Daemon Tools aren’t for beginners, should be paid or else you’ll get a trial version, so we’ll be skipping them. The version we’ll be using is DAEMON Tools Lite. Don’t worry, this version does all the common things a virtual drive applications does. So let’s start this tutorial.
What you need:
– Daemon Tools Lite v4.35.6: download here
– Internet Connection
– 1GHz CPU and atleast 256MB of RAM
– 30MB free of Harddisk space
Instructions:
1. Download and install Daemon Tools Lite
Once you run the setup/installer file of Daemon Tools Lite, it will ask you if you want Paid License or Free License. Choose Free License immediately and click Next.

In the next page, it will ask you some not-so-important things about accessibility of the application. I suggest you uncheck the following:
– Integrate with Windows Explorer: this will create an item to your right-click option which is, in my opinion, not necessary since Daemon Tools isn’t a program you will always use minute by minute, plus, you wouldn’t let your right-click option to be messy, right?
– Windows Gadget: this isn’t really important, and is only applicable for users with Windows Vista or 7 systems.
– Browser Toolbar: this works like Google Toolbar or Yahoo! Toolbar, which is in my opinion, makes your browser eat lots of RAMs!
– Daemon Tools default Search Provider: this will make your search provider to be Daemon Tools as default, and not Google or Yahoo! or even bing.
– Desktop Shortcut: In my case, I don’t use Desktop items, so if you want, you can consider checking it again.
and leave Start Menu Shortcut, checked, alone and click Next just like this:

Uncheck “Browser’s Start Page” and click Next:

After clicking “Next”, on the next page, you will see the destination path the application will be installed to. Leave it to default. For XP (C:\Program Files\DAEMON Tools Lite). For 64-bit systems (C:\Program Files(x86)\DAEMON Tools Lite). Click “Install”, and this will install the entire application. Once finished, click “Finish”.
Note: In some systems, specially those systems that are new to virtual drives, you are required to restart your computer.
2. Run Daemon Tools Lite
To run Daemon Tools Lite, navigate to Start>Programs>Daemon Tools Lite>Daemon Tools Lite
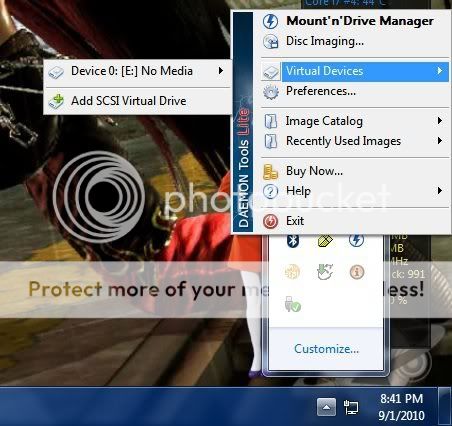
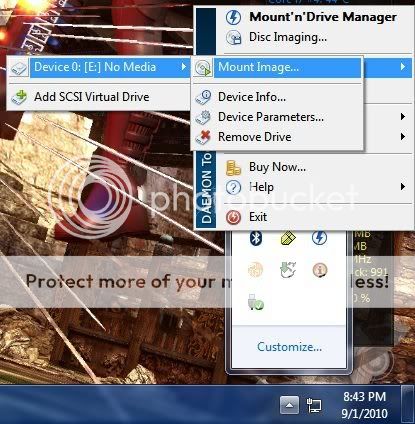
Daemon Tools Lite will be visible to your computer’s system tray, near your system clock. Right click on it to see the options.

After that, navigate to “Virtual Devices”, then “Device 0: [E] No Media”, then “Mount Image”. Note: “E” is a drive letter. It is possible that it will be set to “G” or “F” or what. What you see in the submenu is what is available.

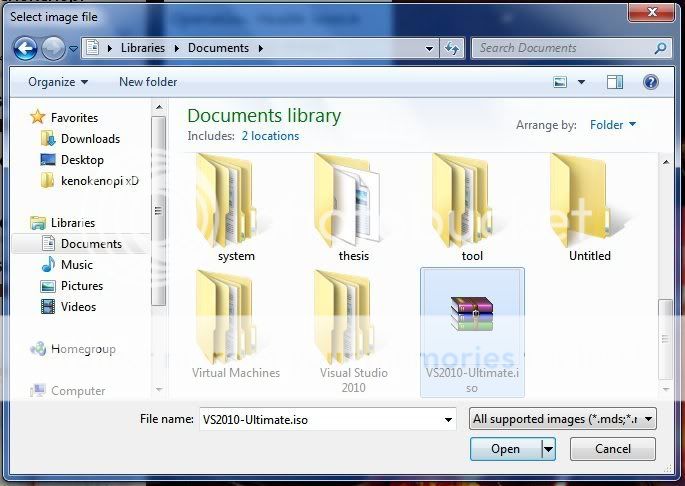
After that, a dialog box will appear, which will let you find the .iso files you need to. In this tutorial, we will be using an installer of Visual Studio Ultimate 2010 which is located at “C:\Users\kenokenopi\Documents” or simply, in the “Documents” folder, with a file name “VS2010-Ultimate.iso”. Locate the file, highlight it then click “Open”.
Once done, navigate to “My Computer” and you will see another optical drive installed, which is physically not true. This is the virtual drive created by Daemon Tools Lite. In this case, it is assigned in the drive letter “E:”.

This means that you can now install Visual Studio Ultimate 2010.
Then that’s it. Once done, you’re done… Enjoy ^^
If you still don’t get it, here’s a video of the tutorial I took just minutes ago:
Sorry for the quality… crappy recorder ^^
To learn more about Daemon Tools Lite, visit their official site here
|> Sum 41 – Motivation
How to format External USB Harddrives to FAT32 in Windows 7 for PS3
Back in the old days, I’ve got 2 pairs of 40GB IDE hard drives. A year later, I bought the new Core i7 rig which uses SATA drives instead of IDE ones. And months later, bought myself a slim 120GB PlayStation 3. I assumed that I can use those old drives for the PS3, just to copy movies and pictures (I have a 4GB flashdrive and I think it’s too small for me to copy those HD Girls’ Generation videos I collected so far). Back in Windows XP, formatting isn’t a problem. You can use either FAT32 or NTFS, or even the older FAT and FAT16. But the big problem is, Microsoft excluded that option in Windows Vista and 7, and I believe, even in the next version of Windows… I even bought an external enclosure for those harddisk and finally I’ve got a solution. Well, it’s not like there’s no other solution but I think this one’s the best.
1. Download this: fat32format
2. Extract it to C:\
3. Run > CMD
4. In the command line, type “cd…” so that it will bring you to C:\
5. type in “fat32format :” and Press Enter. Example: fat32format G: (where G is the drive letter of the external USB drive.)
6. A prompt will appear “Warning ALL data on drive ‘f’ will be lost irretrievably, are you sure (y/n)” and type “y” then press Enter.
7. It will format now, and done!!!
Just a warning. This post doesn’t have anything to do with the current PS3 exploits such as the PSJailBreak. I am against those things and you can try checking out this article if you don’t believe me, Here. Please do not practice this method so you can use those exploits. If you do that, you’re really committing a crime.
Long live PlayStation 3!!!
|> Arch Enemy – We Will Rise
Lesson 2: Ethics in IT
Why Fostering Good Business Ethics?
1. To gain the goodwill of the community.
2. To create an organization that operates consistently.
3. To produce good business.
4. To protect the organization and its employee from legal action.
5. To avoid unfavorable publicity.
Ethics in Information Technology:
1. Today’s workers might have their email and Internet access monitored while at work.
2. Use networks to download music and movies at no change.
3. Hackers break into databases of financial institutions and steal customer information.
4. Student downloading material from Internet.
5. SPAM
Lesson 1: Introduction to Ethics
What is Ethics?
– is a set of beliefs about right and wrong behavior.
– is the study of what is right and wrong.
– comes from the latin word “ethos”, which means characteristic way of acting; and “logos”, which means study.
Virtues – habit that incline people to do what is acceptable.
Vices – habits of unacceptable behavior.
Morality – quality of goodness and badness in human act.
Human Acts – is an act which proceeds from deliberate free will of man.
Elements of Human Acts:
1. Knowledge
2. Freedom
3. Voluntariness
Modifiers of Human Acts:
1. Ignorance
2. Conscience
3. Fear
4. Violence
5. Habit
Netiquette Rules:
1. Do not use other people’s resources without permission.
2. Respect other people’s privacy and security.
3. Your profile reflect who you are.
4. We’re on cyberspace but we’re still humans.
5. One of the limitations of communicating electronically is the difficulty in communicating emotions, so use emoticons.
6. Avoid using captial letters.
7. Respect other people’s time.
8. Know where you are in the virtual world.
9. Know hot to handle flames.
|> Bullet For My Valentine – Your Betrayal
Code of Ethics of the Filipino IT Professionals
I will promote public knowledge, understanding and appreciation of Information technology.
I will consider the general welfare and public welfare and public good in the performance of my work.
I will advertise goods or professional services in a clear and truthful manner.
I will comply and strictly abide by the intellectual property laws, patent laws and other related laws in respect of Information Technology.
I will accept the full responsibility for the work undertaken and utilize my skills with competence and professionalism.
I will make truthful statements on my areas of competence as well as the capabilities and qualities of my product and services.
I will not disclose or use ant confidential information obtained in course of professional duties without the consent of the parties concerned except when required by the laws.
I will strive to atain the highest quality in both the products and services that offer.
I will knowingly participate in the development of the Information Technology.
I will uphold and improve the IT professionals’ standards through continuing profession in order to enhance the IT profession.
___________________
This is the “Code of Ethics of the Filipino IT Professionals”
|> Daft Punk – Digital Love
How To Download Videos From MegaVideo
![]()
This is a trick I found out a month ago. Not quite new, but may help some. Ok, this is only tested and applicable for anyone who uses Internet Explorer. To those who want to download videos from Megavideo, here’s how:
1.Open your MegaVideo video in your browser and let it load fully
2.After you are done watching the video online, go to Tools -> Internet 3.Options -> Settings -> View Files (For IE)
4.Now you will get a large size file with long name and unknown type there
5.Copy and paste that file at desktop, this file is the video file in flv format
Rename it with flv extension, say e.g. MyMega.flv
That’s all and you’re all set! What you need to watch these flv videos is a player that can play .flv. VLC Media Player and Media Player Classic are some choices. Goodluck!
|> Darkest Hour – Tunguska


